
In this lesson students will use the Penicillium chrysogenum fungus, which naturally produces the antibiotic penicillin, to illustrate the historical significance of naturally produced antibiotics. Students will co-culture P. chrysogenum and three species of bacteria to observe differences between penicillin-resistant and penicillin-sensitive bacteria. They will normalize both fungal and bacterial concentrations before co-cultivating, and quantify bacteria to determine antibiotic effect in liquid culture and on solid media. This will teach students about natural product antibiotics as well as experimental design and application.
This experiment allows students to practice several laboratory techniques, which are essential to careers in the biological sciences. They will cultivate and quantify microbiological organisms, practice accurate measurement techniques using several tools, conceptualize experimental design, and connect laboratory experiences to themselves and their understanding of medicine.
The activity requires one week (five days) of class time. Students should be organized into groups of two to four. Groups will collaborate to compile a complete data set for the experiments.
[Download Student Guide for Word] [Download Teacher Guide for Word]

Figure 1. A) Penicillium lawn on PDA showing the ideal area of light green spores harvested and darkness of density of spores on swab. B) Spore suspension showing ideal density by color of LB/spores in 1.7ml micro centrifuge tube. C) Pure fungal cultures in 50ml LB showing ideal growth after four-day incubation. D) Bacterial culture tubes showing pipette tip from inoculation and ideal density after 24h incubation.
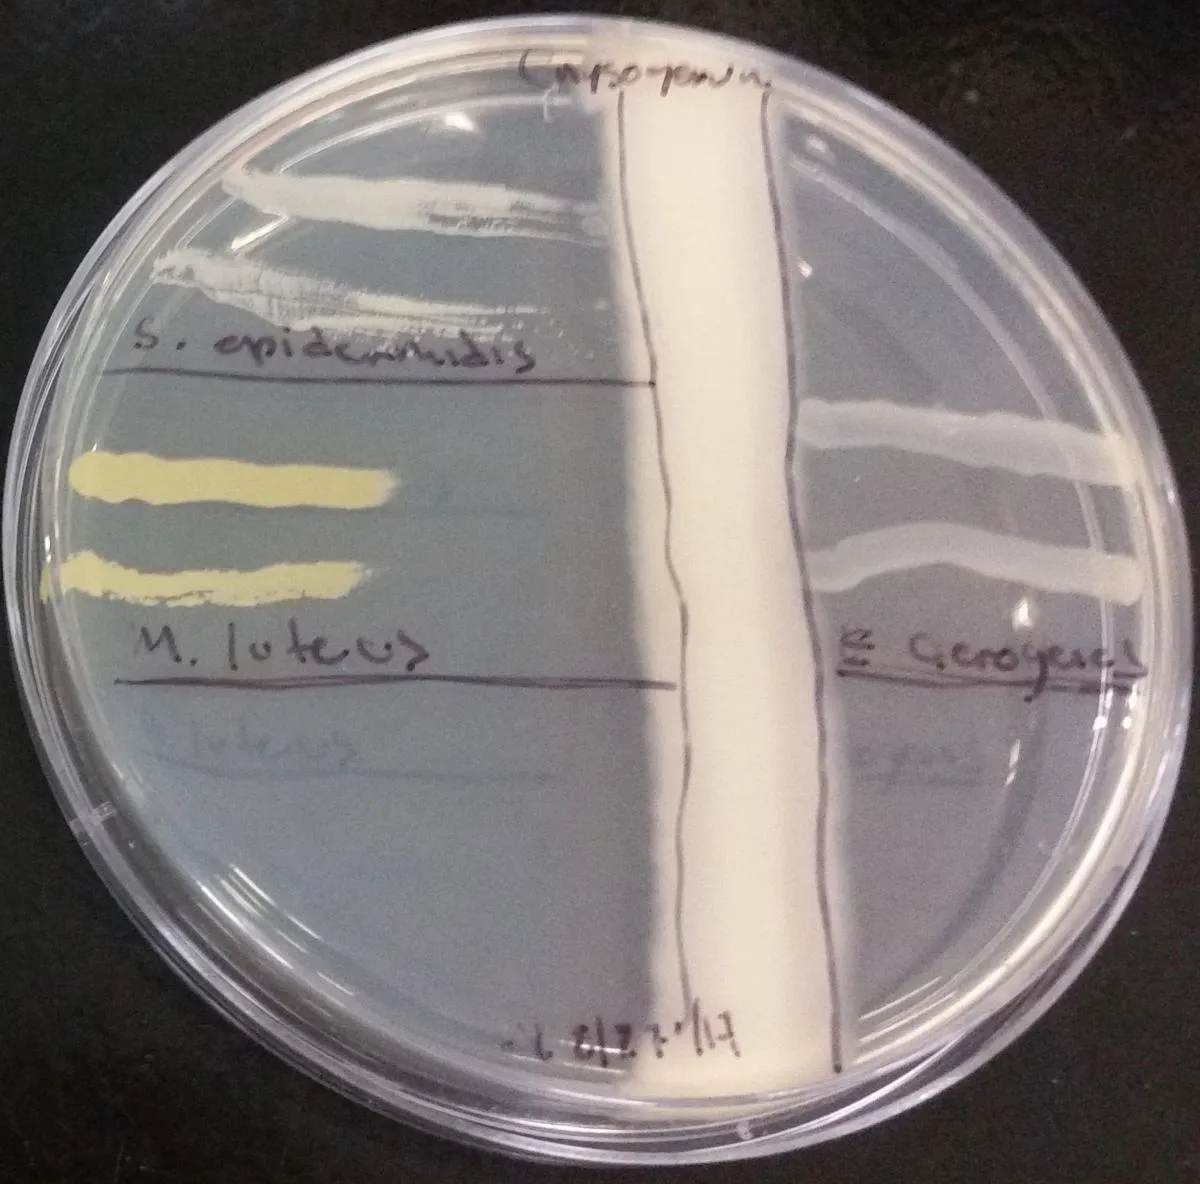
Figure 2. Vertical stripe co-cultivation showing placement of bacterial stripes perpendicular to fungal stripe on LB agar. The bacterial cultures show differential sensitivity to the penicillin diffused into the agar by the fungus.
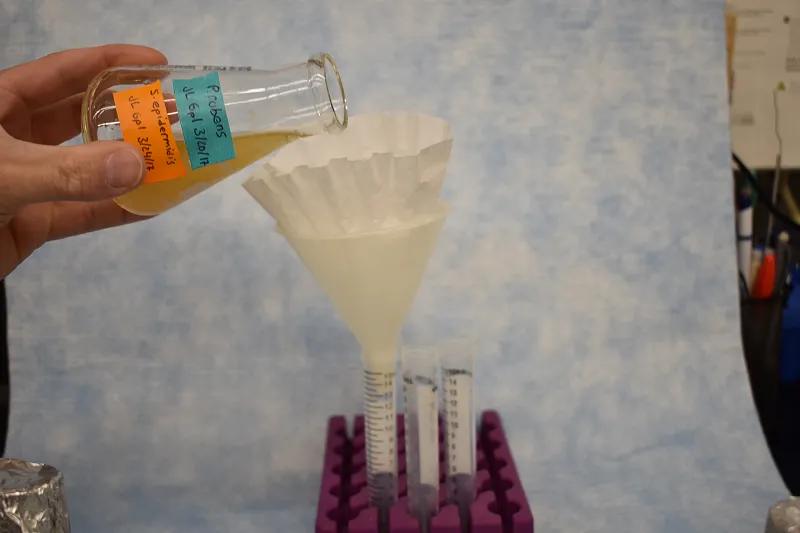
Figure 3. Apparatus for filtering co-culture of bacteria and fungus consisting of coffee filters, conical tubes, a funnel and a rack capable of holding conical tubes upright. Bacteria will readily flow through the coffee filter and funnel into the conical tube. Fungus will remain trapped in the coffee filter.
Penicillium Fungus and Antibiotic Effect.
Background
The discovery of penicillin revolutionized medicine to the degree that penicillin has been called the greatest contribution to medicine of the 20th century. Before the discovery of penicillin and other antibiotics that followed, bacterial infections were common causes of death around the world. In the age before antibiotics, bacterial infections killed more people than heart disease and cancer combined. Today bacterial infections are considered trivial and are often treated with simple, inexpensive pills or ointments.
Penicillin was the first true antibiotic discovered in 1928 by Dr. Alexander Fleming. After returning from a vacation, Dr. Fleming noticed a greenish mold contaminating one of his bacteria plates. He observed that the bacteria would die within a zone around the mold leaving a clear ring. He isolated the mold in pure culture and determined that it was the common green bread mold, Penicillium. Many scientists would have dismissed this as a ruined experiment but Dr. Fleming was observant. His curiosity drove him to write a short scientific article on his observations.
Several years later, Fleming’s note caught the attention of Dr. Howard Florey, Dr. Norman Heatly, and Dr. Ernst Chain. These researchers conducted experiments to show that penicillin could be used to cure bacterial infections in a living organism (in vivo) and was suitable for use in mice and ultimately humans.
Our experiment
To understand what the early researchers might have witnessed, we can design an experiment to test the antibiotic effect of one species of Penicillium.
As a class, we will grow flasks of fungus in liquid cultures. We will test the fungus for penicillin antibiotic activity against three bacterial species with different levels of penicillin sensitivity: Staphylococcus epidermidis, Micrococcus luteus, and Enterobacter aerogenes. We will measure the concentration of bacteria in each flask after growing overnight with the fungus.
We can measure concentration of bacteria using a technique called optical density measurement (OD600). We will need to filter the fungus out of the culture, then we will compare the concentration of bacteria only cultures to each filtered co-culture.
Experimental Goals:
- Practice accurate measurement techniques.
- Calculate dilutions.
- Observe bacterial sensitivity to penicillin.
- Contemplate designing experiments for accurate results.
Materials (recipes below)
Shared as a Class
- P. chrysogenum culture plate, grown 7 days on Potato Dextrose Agar (PDA)
- S. epidermidis LB agar plate, grown 48h at 30-37°C, can be stored at 4°C for £1 month
- M. luteus LB agar plate, grown 48h at 25-30°C, can be stored at 4°C for £1 month
- E. aerogenes LB agar plate, grown 24 h at 25-37°C, can be stored at 4°C for £1 month
- Orbital shaker
Per Group
- 1x spectrophotometer (or colorimeter at 590-610nm)
- 1x sterile 2ml microcentrifuge tubes with 1.8ml LB (Miller)
- 3x sterile cotton tipped applicators
- 1x sterile box of p1000 tips
- 1x sterile box of p200 tips
- 6x cuvettes
- 6x sterile 125ml Erlenmeyer flasks with 25ml LB (Miller) each
- 1x LB agar plates
- 3x sterile 5ml culture tubes
- 3x sterile 50ml graduated cylinder or falcon tube
- 3x sterile 250ml Erlenmeyer flasks with 75ml 2xLB (Lennox) each
- 3x sterile 1ul inoculating loops or reusable metal loop
- 3x non-sterile 50ml Falcon collection tube
- 1x funnel (ensure spout fits in collection tube)
- 7x non-sterile coffee filters
Procedure
Preparation:
(Working cultures need to be fresh)
- If starting from stock: Start fungal culture from stock onto potato dextrose agar (PDA) two weeks prior to activity. Incubate at 25°C for one week.
- Sub-culture fungus by spreading spores from primary (from stock) plates onto secondary PDA 1 week prior to activity and incubate at 25°C for one week (Figure 1a).
- Start bacterial cultures from glycerol stocks onto LB agar no more than two weeks and no less than two days before the co-cultivation experiment. Incubate M. luteus and S. epidermidis at 30°C for 48h and E. aerogenes at 30°C 24h. Bacterial culture plates may be stored at 4°C until activity.
- Serilize 25ml LB broth (Miller) in 125ml flasks (6 per group) and 75mL 2xLB broth (Lennox) in 250ml flasks (3 per group).
- Prepare 1 per group 2ml micro centrifuge tubes with 1.8ml LB (miller) broth
Penicillium (fungal) spore suspensions
- Begin by initializing and blanking your spectrophotometer (spec)
(for Thermo Spectronic 200):
- Plug in and turn on. Wait until it shows “Remove cuvette and press ok…” Check that the spec is empty and press the ↵. Select OD600 from the menu options and press ↵ when the next screen appears
- Fill a cuvette with 900ml LB. Put it into the holder in the spec. Ensure that the clear windows of the cuvette are in line with the beam of light (facing left and right in a Spec 200). Close the lid and press the “0.00” button. Keep this cuvette for step 5. (Each cuvette has a slightly different effect on the measurement so make sure that you blank each cuvette in this way before use for the remainder of the experiments.)
- If using a WPA CO7500 colorimeter: Turn instrument on, place 900ul LB cuvette in the holder in the correct orientation (windows front to back) and press “Z” to blank.
- Label the 2ml centrifuge tubes containing 1.8ml LB broth with “SS” for spore suspension and your group number. (For example “SS1”) Dip a sterile cotton swab into the LB tube.
- Using sterile technique, collect spores from the P. chrysogenum plate by rubbing the LB broth soaked cotton swab on the plate. Collect an area roughly the size of your pinky finger. Press firmly while rubbing, but not so firmly to break the agar.
These plates can be shared among several groups. Select a fresh area of the culture for harvesting each time.
6. Put the cotton swab with spores back in the SS tube and twirl it to mix in the spores. Continue about 10 seconds until the suspension looks cloudy, green, and homogenous.
7. Make a 1/10 dilution in your cuvette from step 1:
- Pipette up and down to mix spore suspension.
- Pipette 100ml of your spore suspension into the same cuvette as in part 5a. Reseal and and set the SS tube aside.
- Pipette up and down to in the cuvette mix the dilution thoroughly.
- Make sure you leave all the suspension in the cuvette after mixing.
- Place the cuvette in the instrument and measure the absorbance.
- Make sure that the OD600 reading on the spec is above 1.0. If not, you need to add more spores from the plate to the 2mL tube
8. Measure the spore concentration with the spec and record the result in Table 1 below (Absorbance values have no units like milliliters or grams)
9. Remember the spec reading is 1/10 the Actual OD of the spores in your tube because you made a dilution. Multiply your Spec Readings by 10 to get the Actual OD.
Table 1: Spore suspension optical density data
| Measurement | Spec Reading | Actual OD600 |
|---|---|---|
| P. chrysogenum sopre suspension | 1.36 x10= | 13.6 |
10. We want to make sure we are working with the same starting concentrations for each of our experimental conditions. To do this we need to “normalize” the concentration of spores we add to each flask to the same amount. To normalize the volume of fungal spores you add to each culture, you will need to calculate the volume of SS we need to add to the culture flasks of LB broth for the ideal culture starting concentration.
a. For the dilution use the calculation equation C1 x V1=C2 x V2
b. This can be re-written:
(Actual OD in your 5ml tube) x (Volume of SS to add in ml) =
(0.05 ideal concentration in culture flask) x (25ml LB broth in culture flask)
c. (Volume of SS to add) = (0.05 x 25ml)/ (Actual OD in your 5mL tube)
d. Multiply answer by (1000ml /1ml) to convert to ml
- For example: OD600 = 13.6 A, calculate:
13.6 x V1ml = 0.05 x 25ml
V1 = (0.05 x 25ml)/13.6 = 0.092ml or 92μl
| Actual OD from Table 1 | Volume Calculated in mL | Volume to add in mL |
|---|---|---|
| 13.6 | 0.092ml x10= | 92ul |
10. Inoculate the liquid media flasks
- Mix the “SS” tube containing the spore suspension by inverting the tube 3 times.
- Loosen the foil on the flask before pipetting the volume from step d into three of the flasks containing 25ml LB.
- Use tape to label these flasks with the P. chrysogenum, your group number and initials, and the date.
11. Place all 6 flasks next to each other on an orbital shaker to be left for 72h or 3 full days at 25°C shaking at 100rpm.
(3 of your 6 flasks will be sterile LB that you will use it as a bacteria control in step 16.)
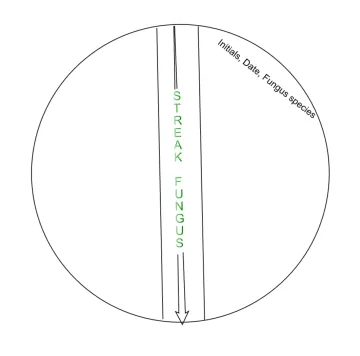
12. Finally, we will use some of the remaining spores to make a vertical stripe on an LB agar plate.
- Label your LB agar plate “P. chrysogenum” with the date, and your initials
- Dip a new sterile cotton swab into the “SS” tube.
- Make one swipe across the center of the LB agar plate.
Streak example
Culturing Bacteria (DAY 3)
13. Inoculate 5ml LB broth (Miller) broth in a culture tube with each bacterial species.
- Label 3 culture tubes containing 5ml LB broth (Miller) each with your group number and the following:
1. “S. epi”
2. “M. luteus”
3. “E. aero”
- Using sterile technique, attach a sterile 20 – 200ul pipette tip to a p20 or p200 pipette.
- Collect ~1mm3 or 1-2 colonies of bacteria from the S. epidermidis plate at the end of the pipette tip.
- Eject the tip using the ejector button on the pipette into the S. epi labeled culture tube containing 5ml LB (Miller) broth.
- Repeat using the correct bacteria for M. luteus and E. aero culture tubes.
14. Incubate your tube with the rest of the class by shaking at 180 rpm overnight (until class the next day) at 30°C.
Co-cultivation (DAY 4)
On the 4th day of the experiment, the cultures are ready to be co-cultivated. (bacteria added to fungus)
15. Determine the relative bacteria concentration by measuring OD600 of your overnight bacterial culture from the 5mL LB broth (Miller) culture tubes.
- Blank the spectrophotometer with 900ml LB broth (Miller) in a cuvette.
- Make sure your 5ml S. epidermidis culture is well mixed by pipetting up and down with a p1000 set to 1ml.
- Pipette 100ml of bacteria into the cuvette containing 900ml LB broth (Miller) and pipette up and down to mix.
- Measure OD600 and record value for Spec Reading and Actual OD (Spec Reading times 10 = Actual OD)
- Repeat steps 15a-15d with your M. luteus, and E. aerogenes 5ml cultures.
- Record your results in table 2.
Table 2: Bacterial overnight culture optical density data
| Bacterial Species | Spec Reading | Actual OD600 |
|---|---|---|
| S. epidermidis | 0.528 | 5.28 |
| M. luteus | 0.499 | 4.99 |
| E. aerogenes | 0.478 | 4.78 |
16. Co-cultivating flasks with bacteria:
Prior to co-cultivating the bacteria with the fungus, you will normalize all three bacterial cultures so that you are adding the same concentration of each culture to the fungus. Each dilution of bacteria will be normalized to OD600 0.05. This time you will dilute the bacteria in 75ml of 2x LB broth (Lennox)
(Recall C1V1=C2V2 from step 8.)
- For example: OD600 = 5.28 A, calculate:
5.28 x V1ml = 0.05 x 75ml
V1 = (0.05 x 75ml)/5.28 = 0.710ml or 710μl
- Label “S. epi” on a 250ml flask containing 75ml 2x LB broth (Lennox).
- Add the volume of S. epidermidis culture you calculated in step 15a (V1) to the 250ml flask containing 75ml of 2x LB broth (Lennox) and swirl to mix.
- Using a sterile 50ml Falcon tube, add 25ml of the 0.05OD S. epidermidis dilution from the 250ml flask to one of the 125ml flasks containing 25 ml sterile LB broth (Miller).
- Using the same 50 ml Falcon tube from step 15c, add 25ml of the 0.05OD S. epidermidis dilution from the 250ml flask to one of the 125ml flasks containing 25ml liquid culture of P. chrysogenum.
- Repeat steps 15a-15d for M. luteus and E. aerogenes using a NEW sterile 50ml Falcon tube for each species of bacteria
- You should now have 6 prepared flasks
- Pure S. epidermidis
- S. epidermidis and P. chrysogenum
- Pure M. luteus
- M. luteus and P. chrysogenum
- Pure E. aerogenes
- E. aerogenes and P. chrysogenum
17. Incubate the mixed cultures at 25°C overnight shaking at 100rpm.
18. The last step for today is to inoculate bacteria on the vertical stripped P. chrysogenum LB agar plate you made the other day.
- Using sterile technique, dip a sterile inoculating loop into the S. epidermidis 5ml overnight bacterial culture.
- Make two stripes starting at the edge of the plate perpendicular to the fungus moving the loop toward the fungus. (Make the second stripe without dipping the loop back into the bacterial culture.)
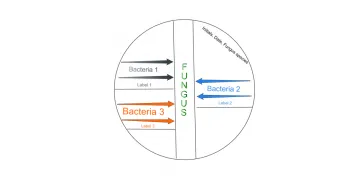
- Label with the bacteria name just under the stripes.
- Repeat steps 20a – 20c with M. luteus and E. aerogenes. You can use both left and right sides of the fungal stripe.
- Incubate at 25°C over night.
Measurement (Day 5)
On day 5, the bacteria will have experienced the effect of the antibiotic and are ready for measurement.
19. Label 6x 50ml Falcon collection tubes with the names of your bacteria and fungus as listed in step 15f.
20. The cultures need to be filtered to separate the bacteria from the fungus.
- Fold a coffee filter into quarters. (See image at bottom of page.)
- Pull one fold apart from the others so that it makes a cone and place this into the funnel. Place the funnel in a collection tube.
- Swirl the flask to re-suspend the bacteria then immediately pour about 15mL from the pure S. epidermidis flask through the filter.
You can use the graduations on the side of a falcon tube collection tube for approximate measurement.
- Save the filtrate in the collection tube.

21. Throw away the coffee filter and shake off the liquid from the funnel into the biohazard waste.
22. Repeat steps 20 & 21 for all 6 overnight culture flasks.
23. Measure the OD600 of the filtrate from each tube:
- Pipette 900ml 50:50 LB broth mixture into a new cuvette.
TEACHER: Prepare a volume of this ahead of time by approximating a 50:50 mix of LB broth (Miller) and 2xLB broth (Lennox)
- Blank the spectrophotometer with the above cuvette.
- Pipette 100mL of filtrate from the falcon tube into the cuvette.
- Measure the OD600 and record your reading in Table 3. (Remember that the spec reading is 1/10th the Actual OD600)
- Repeat steps 22a-22d for all flasks
Table 3: Antibiotic effect data.
|
Sample |
OD600 of pure bacterial culture |
OD600 of fungus/bacteria co-culture |
|---|---|---|
|
S. epidermidis |
5.73 |
2.57 |
|
M. luteus |
1.95 |
0.045* |
|
E. aerogenes |
4.84 |
3.39 |
|
Sample |
OD600 of pure bacterial culture |
OD600 of fungus/bacteria co-culture |
|
S. epidermidis |
5.73 |
2.57 |
|
M. luteus |
1.95 |
0.045* |
|
E. aerogenes |
4.84 |
3.39 |
Measuring the vertical stripe plates.
- Using a metric ruler, measure the distance from the vertical stripe of fungus to the first sign of bacteria in the bacterial stripes. Do this for each of the bacteria on your plate.
- Record any observations and differences you can see in Table 5. Focus on the way the bacteria are growing. How are they different from each other?
Table 5: Bacterial stripe measurements
|
Bacterial species |
Distance to stripe 1 (cm) |
Distance to stripe 2 (cm) |
Average distance (cm) |
|---|---|---|---|
|
S. epidermidis |
1.4cm |
1.1cm |
1.25cm |
|
M. luteus |
3.1cm |
2.7cm |
2.29cm |
|
E. aerogenes |
0.0cm |
0.0cm |
0.0cm |
Space for observations notes:
RECIPIES
LB broth (Miller)
1.0% Tryptone (10g/l)
0.5% Yeast extract (5g/l)
1.0% NaCl (10g/l)
Autoclave at 121°C for 20 minutes to sterilize
LB agar (Miller)
1.0% Tryptone (10g/l)
0.5% Yeast extract (5g/l)
1.0% NaCl (10g/l)
1.5% Agar (15g/l)
Preparation of LB (Miller) agar
- Mix ingredients.
- Use a flask that is twice the volume you intend to make (i.e. 2L flask for 1L media, 2x 1L flasks with 500ml each, etc.)
- Autoclave at 121°C for 20 minutes to sterilize.
- Pour plates @ ~25mL/plate (pour until media covers bottom).
- Allow plates to “dry” 24h before bagging. Store at 4°C as long as is needed.
2x LB Broth (Lennox)
2.0% Tryptone (20g/l)
1.0% Yeast Extract (10g/l)
1.0% NaCl (10g/l)
Autoclave at 121°C for 20 minutes to sterilize
Potato Dextrose Agar (PDA)
20.0% Potato (200g/l)
2.0% Dextrose (20g/l)
1.5% Agar (15g/l)
Preparation of PDA
- Boil sliced, unpeeled potatoes in 1L distilled water for 30 min.
- Use a flask that is twice the volume you intend to make (i.e. 2L flask for 1L media, 2x 1L flasks with 500ml each, etc.)
- Filter through cheesecloth, saving liquid.
- Bring to 1L with graduated cylinder.
- Add dextrose while mixing to dissolve.
- Add agar.
- Autoclave 20min at 121°C to sterilize.
- Pour plates @ ~25mL/plate (pour until media covers bottom).
- Allow plates to “dry” 24h before bagging. Store at 4°C.